A few months ago I dropped my Android phone to buy an iPhone SE, mostly because I was looking for a good 4" phone, but also because I wanted to experience more than a single mobile platform.
It came up as a weird decision to make since I've been professionally developing Android apps for the last 5 years, but I really enjoyed the few months I spent with it, and I chose iOS as a target for my next side project: Memori.
I usually have a hard time finishing side projects, be it the lack of time, the slowly diminishing motivation, the doubts, the endless refactoring and design choices, etc… So I read a book[1] to learn iOS and I gave myself 10 days to release a working app on the App Store.
Idea
I have a terrible, terrible memory. I forget places I've been to, movies I've watched, books I've read, people's name, birthdates… But besides that, I can repeat a 3 minutes long sentence from my favorite movie, or remember the context of any quote from my favorite show, just because I've watched them many times. I figured I could make an app to help me remember the things I don't naturally come back to regularly.
I wrote some ideas and described exactly what the app should do. I tried to find the features that would be enough for an MVP[1:1]:
- Create cards for each memory
- Organize them as collections
- Generate random quizzes
- Show a visual clue on the learning progress
I stripped away all the things that were not strictly necessary:
Sharing of memories between peopleOnline catalog of memories for common thingsAutocompletion of memories for books, movies…Synchronization between devicesDaily notifications
UI/UX

After some drawings on a piece of paper I quickly got on Sketch. It's a very effective tool to create the whole user interface, from screens to icons and logos.
I like to work early on the logo, it makes me more confident for designing the whole app. Unfortunately I'm no illustrator, I'm not even a designer, and I had a chaotic start:
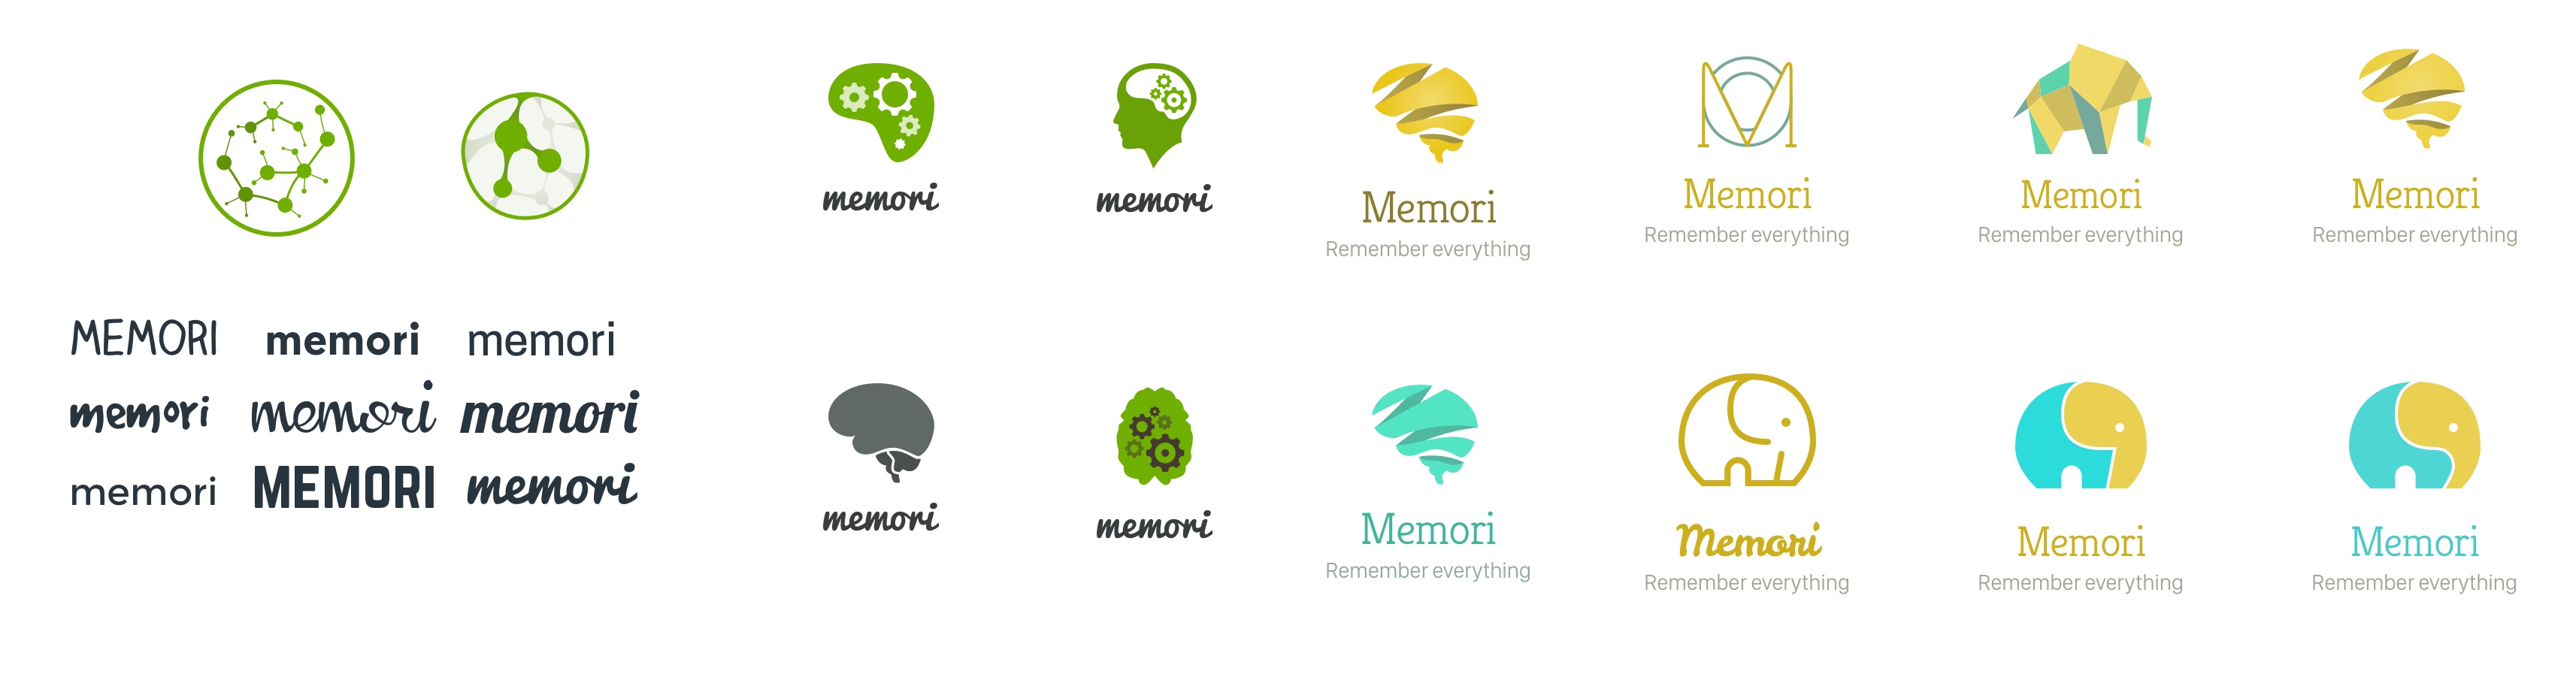
I had a good feeling with the elephants, so I pushed it a little bit further, and settled the colors.
![]()
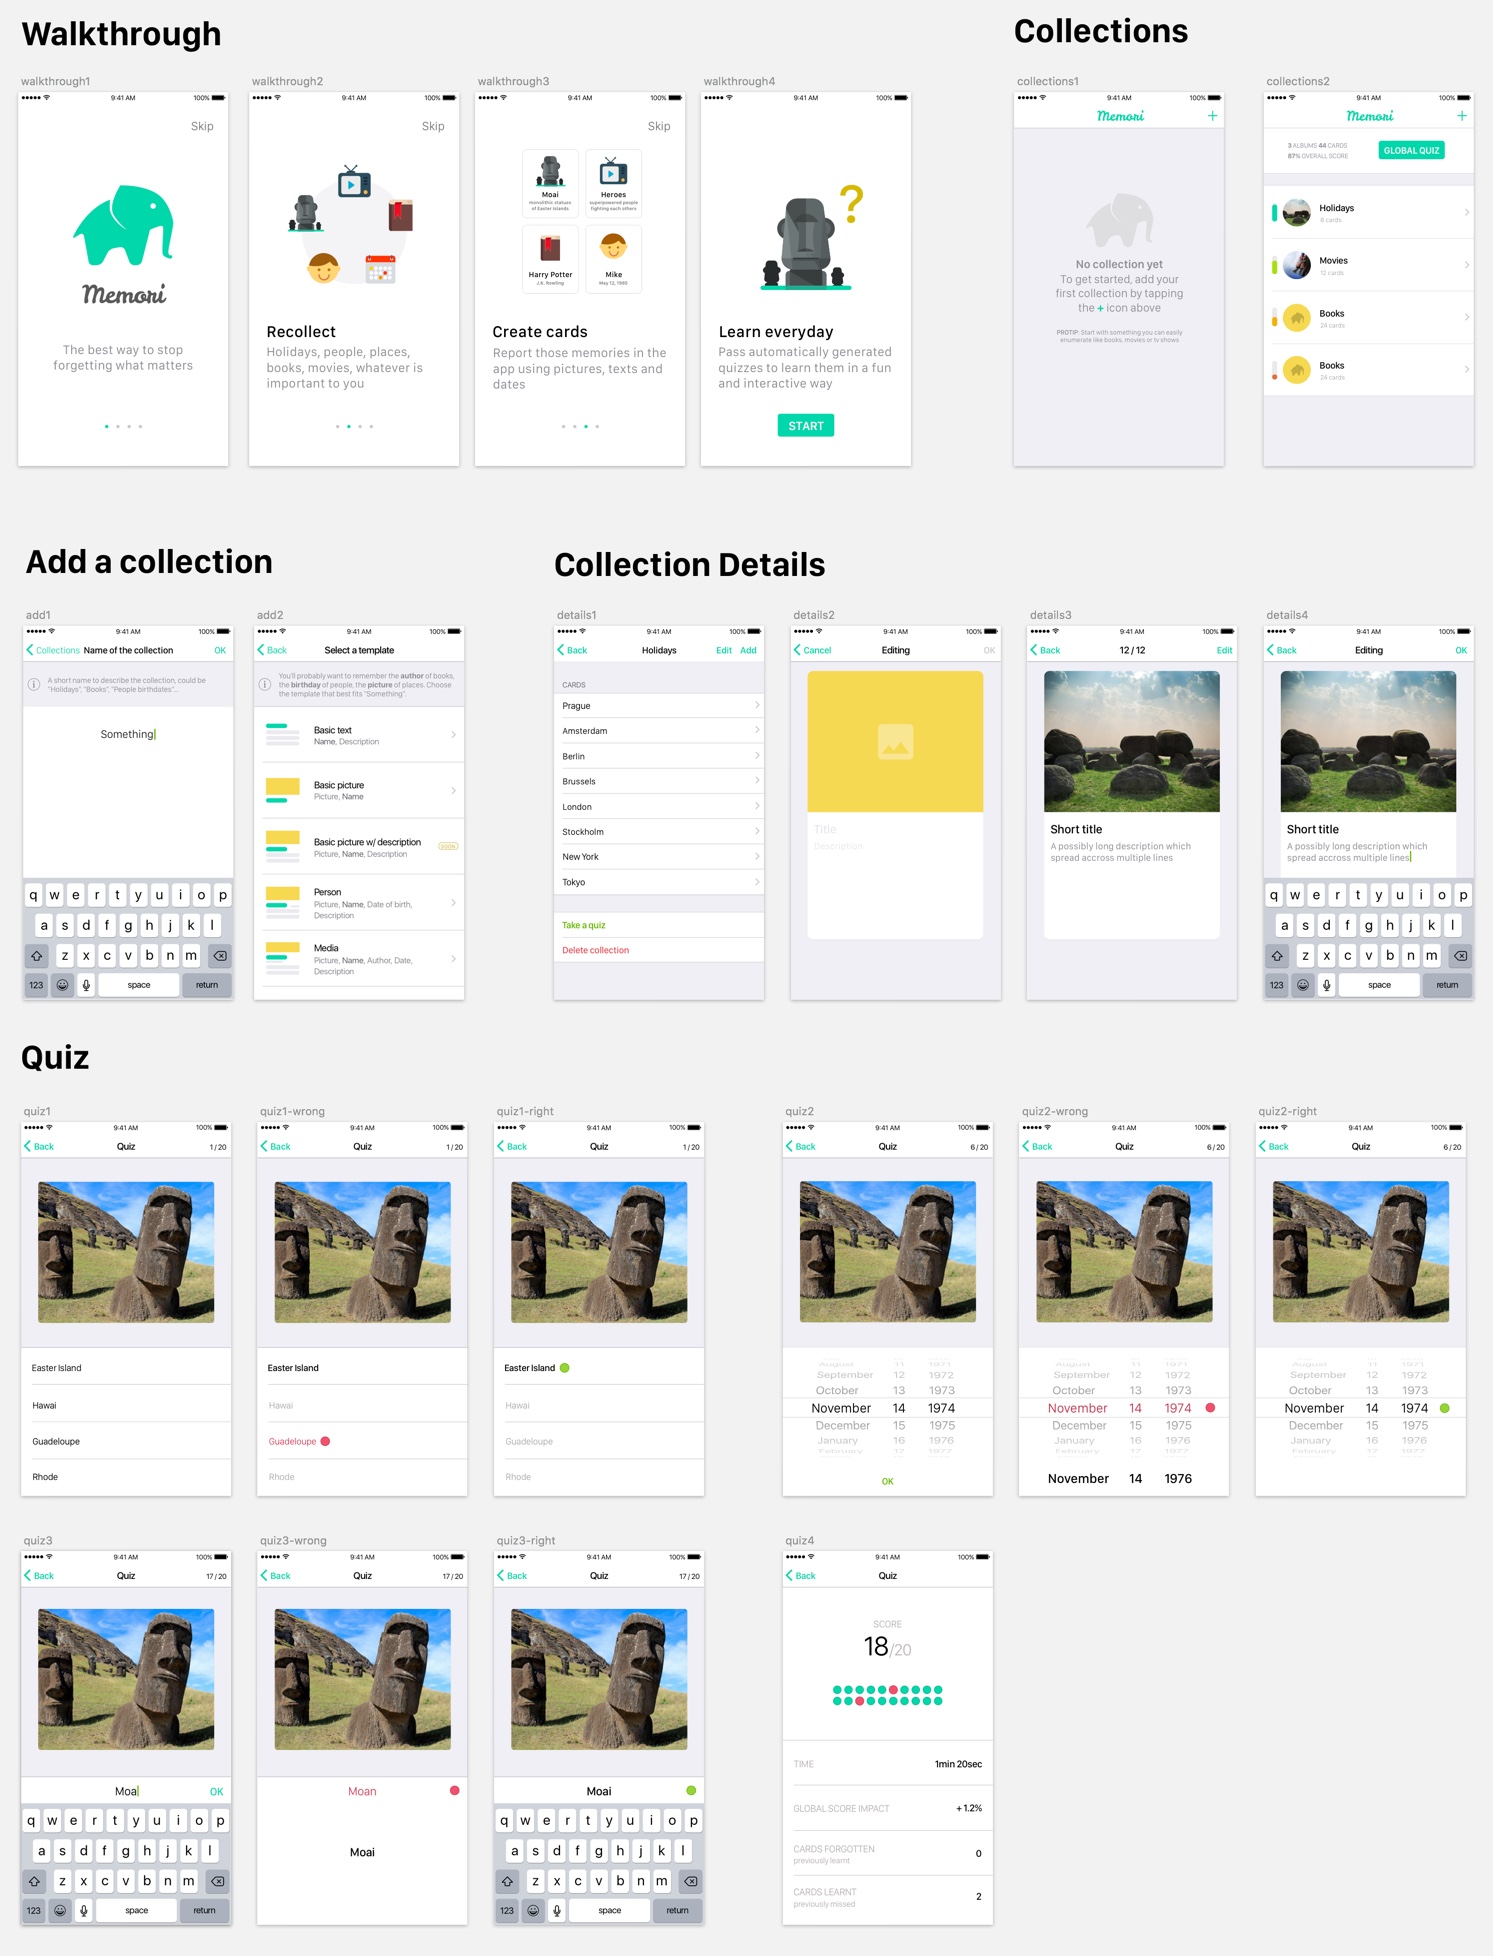
I then spent two days on Sketch creating the whole app UI / UX. I'm used to the Android standards so the UX took me some time. Hopefully I found help:
- The Apple UI guidelines are a good read, especially the part on UI Bars, UI Views and UI Controls. They contain many details on where and when the standard components should be used.
- A complete iOS kit for Sketch, made by Philip Amour. It's a Sketch project containing most standard UI components to copy and paste on your own projects.
After these two days, here's what it looks like on Sketch:
Swift
I started working on XCode 8 with Swift 3, which was just released. A few days before I was still learning on Swift 2.3, and I really liked the changes they made on the API and naming conventions.
On Android I've been using Kotlin for more than a year. The Swift syntax and concepts are really close.
Internal / external parameter names
One of my favorite language feature is actually what disturbed me the most at first: internal/external parameter names. It makes function calls with more than 2 parameters a lot more readable, without messing with the parameter names inside the function:
// Declaration
func createView(for card: Card, withHandler handler: Handler) { ... }

// Usage
createView(for: card, withHandler: self)
Extensions
Extensions are very useful, not only to add behavior to an external type, but also to create distinct blocks inside a class. For example, if a UIViewController also needs to be a UITextFieldDelegate, I use an extension instead of implementing both in the same block:
class MyViewController : UIViewController {
    // UIViewController method
    override func viewDidLoad() { }
}

extension MyViewController : UITextFieldDelegate {
    // UITextFieldDelegate method
    func textFieldDidBeginEditing(_ textField: UITextField) { }
}
It's nice to be able to immediately see which method comes from which protocol. Once applied to the whole project, it gets easier to browse the code and quickly understand what a class does.
Note that it's not exactly as if the class implemented the protocol directly: the extension can't access private fields of the class.
Value types (struct)
Value types are disturbing for someone coming from Java/Kotlin or even Javascript. Here's an example usage:
struct Offset {
    var x: Int
    var y: Int
}

var offset1 = Offset(x: 1, y: 1)
var offset2 = offset1
offset2.x = 3 // Doesn't change offset1
Value types have multiple benefits, including natural thread-safety and in some case reduced heap usage (structs can be allocated directly on the stack), but the greatest is that it allows local reasoning. You can take any piece of code, understand what it does, and be confident it has no implicit side effects. There are some interesting WWDC talks about structs here, here, and here.
Cocoa Touch
Persistence
When I considered options for the persistence layer, I didn't want to use any third-party library since it was my first iOS app and I wanted to experience the native solutions first. So I had basically two choices: NSCoding (file) and Core Data (database), both of which don't support structs… 🙄
struct Book {
    let id: String
    let name: String
    let templateKey: String
    var cardsCount: Int
    var averageKnowledge: Float
}
Core Data would be overkill for such a small app, especially since the only requests on the data would be "get all books" and "get all cards for that book". So I went for NSCoding. To work around the fact it doesn't handle structs, I created a protocol (an "interface") specifying how to convert back & forth my model to an NSCoding-compliant data structure.
protocol Storable {

    // Describe how to create this Storable from
    // a persisted dictionnary
    init(withPersistenceData data: [String: Any])

    // Get a persistable dictionnary from
    // this Storable
    func persistenceData() -> [String: Any]

}
Which gives, for the Book struct:
extension Book : Storable {

    init(withPersistenceData data: [String : Any]) {

        guard
            let id = data["id"] as? String,
            let name = data["name"] as? String,
            let templateKey = data["templateKey"] as? String,
            let cardsCount = data["cardsCount"] as? Int,
            let averageKnowledge = data["averageKnowledge"] as? Float
        else { fatalError("Corrupted data") }

        self.init(id: id, name: name,
            templateKey: templateKey,
            cardsCount: cardsCount,
            averageKnowledge: averageKnowledge)

    }

    func persistenceData() -> [String : Any] {

        var dict = [String: Any]()
        dict["id"] = id
        dict["name"] = name
        dict["templateKey"] = templateKey
        dict["cardsCount"] = cardsCount
        dict["averageKnowledge"] = averageKnowledge
        return dict

    }

}
This is far from the ideal solution, very error prone since Any could be anything, even something that's actually not NSCoding-compliant. But I had no time to do better, so instead I created unit tests for the store, which would allow me to safely improve later.
Testing
Unit tests are really easy to configure and run, but they need to run on a device/simulator, as opposed to Android unit tests that can run on a JVM.
func testBookPersistence() {

    // Prepare
    let book = Book(id: "id", name: "name",
        templateKey: "templateKey",
        cardsCount: 3,
        averageKnowledge: 0.5)

    // Run
    testStore.update(books: [book])

    // Assert
    let out = testStore.books().first!
    XCTAssertEqual(out.id, book.id)
    XCTAssertEqual(out.name, book.name)
    XCTAssertEqual(out.templateKey, book.templateKey)
    XCTAssertEqual(out.cardsCount, book.cardsCount)
    XCTAssertEqual(out.averageKnowledge, book.averageKnowledge)

}
Animations
I was really surprised with the animation framework, the API is very fluent, and can be applied to view properties as well as AutoLayout constraints.
UIView.animate(withDuration: 0.3) {
    self.startButton.alpha = 1
}
I'm not sure how UIView.animate works. I guess it sets a static state somewhere saying "all animatable changes are to be animated with this duration" for the time the given closure is executed, and all views rely on it.
Configurable custom views
I like creating custom views, and make them configurable externally. For example, I wanted these progress indicators on each Memori collection:

But I wanted to make the colors configurable from the interface builder, since it's the place where most colors are set (backgrounds, texts, etc…). Doing so on Android is cumbersome, you need to create an XML file, declare the properties on your class then set them programmatically when the view is created. All it takes on iOS is @IBInspectable:
@IBInspectable var background: UIColor = UIColor.gray
@IBInspectable var low: UIColor = UIColor.black
@IBInspectable var average: UIColor = UIColor.black
@IBInspectable var high: UIColor = UIColor.black
@IBInspectable var max: UIColor = UIColor.black

Lifecycle
My general feeling is that iOS development is easier than Android development, and a very good example of that is the lifecycle complexity of Activity/Fragment vs UIViewController:
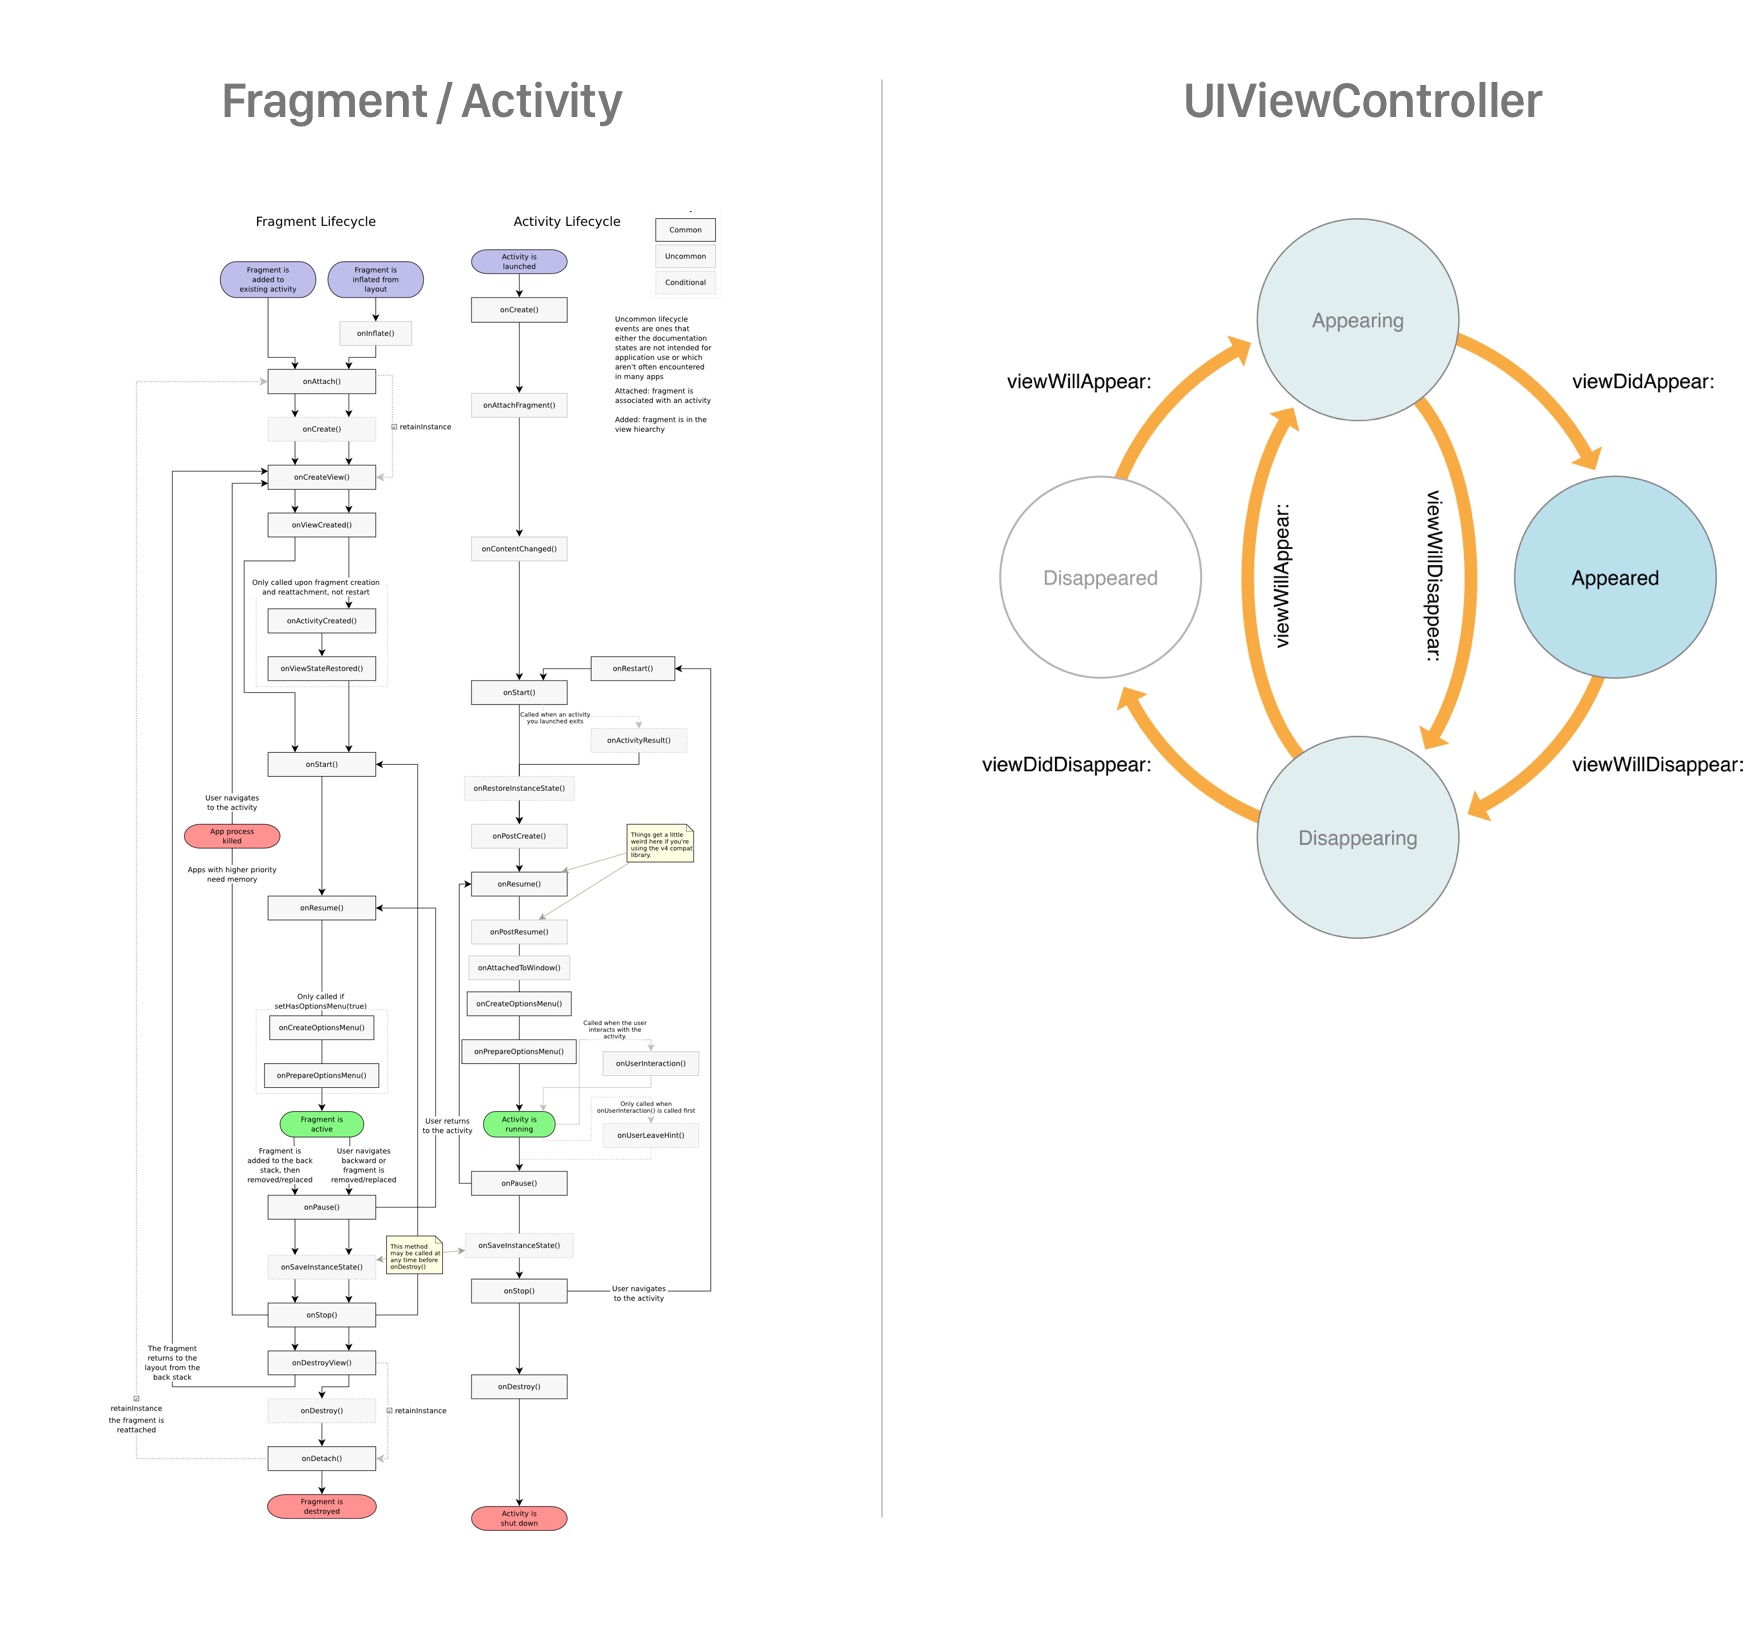
There's no concern about screen rotation, previous controllers being possibly killed while the user navigates in the app, no distinction between Activity and Fragment (fullscreen / part of the screen). Also, there are no "compat" libraries to deal with previous versions of the OS, mostly because it's safe to consider that users have the latest version.
Storyboard
It took me some time to get used to the Interface Builder and Auto Layout, but it allows to create interfaces really fast compared to Android XML files. I guess that's why Google released ConstraintLayout for Android earlier this year, I haven't tried it though.
The notion of storyboard — a set of UIViewController with links — is nice, it gives a good overview of the app with the different screens and how they interact with each other. But it also has some serious flaws.
- The storyboard takes longer to open once you add a few screens.
- Storyboard segues (the "links" between the screens) induce unsafe code on the source
UIViewControllerside. For example, after setting up this segue in the Storyboard:
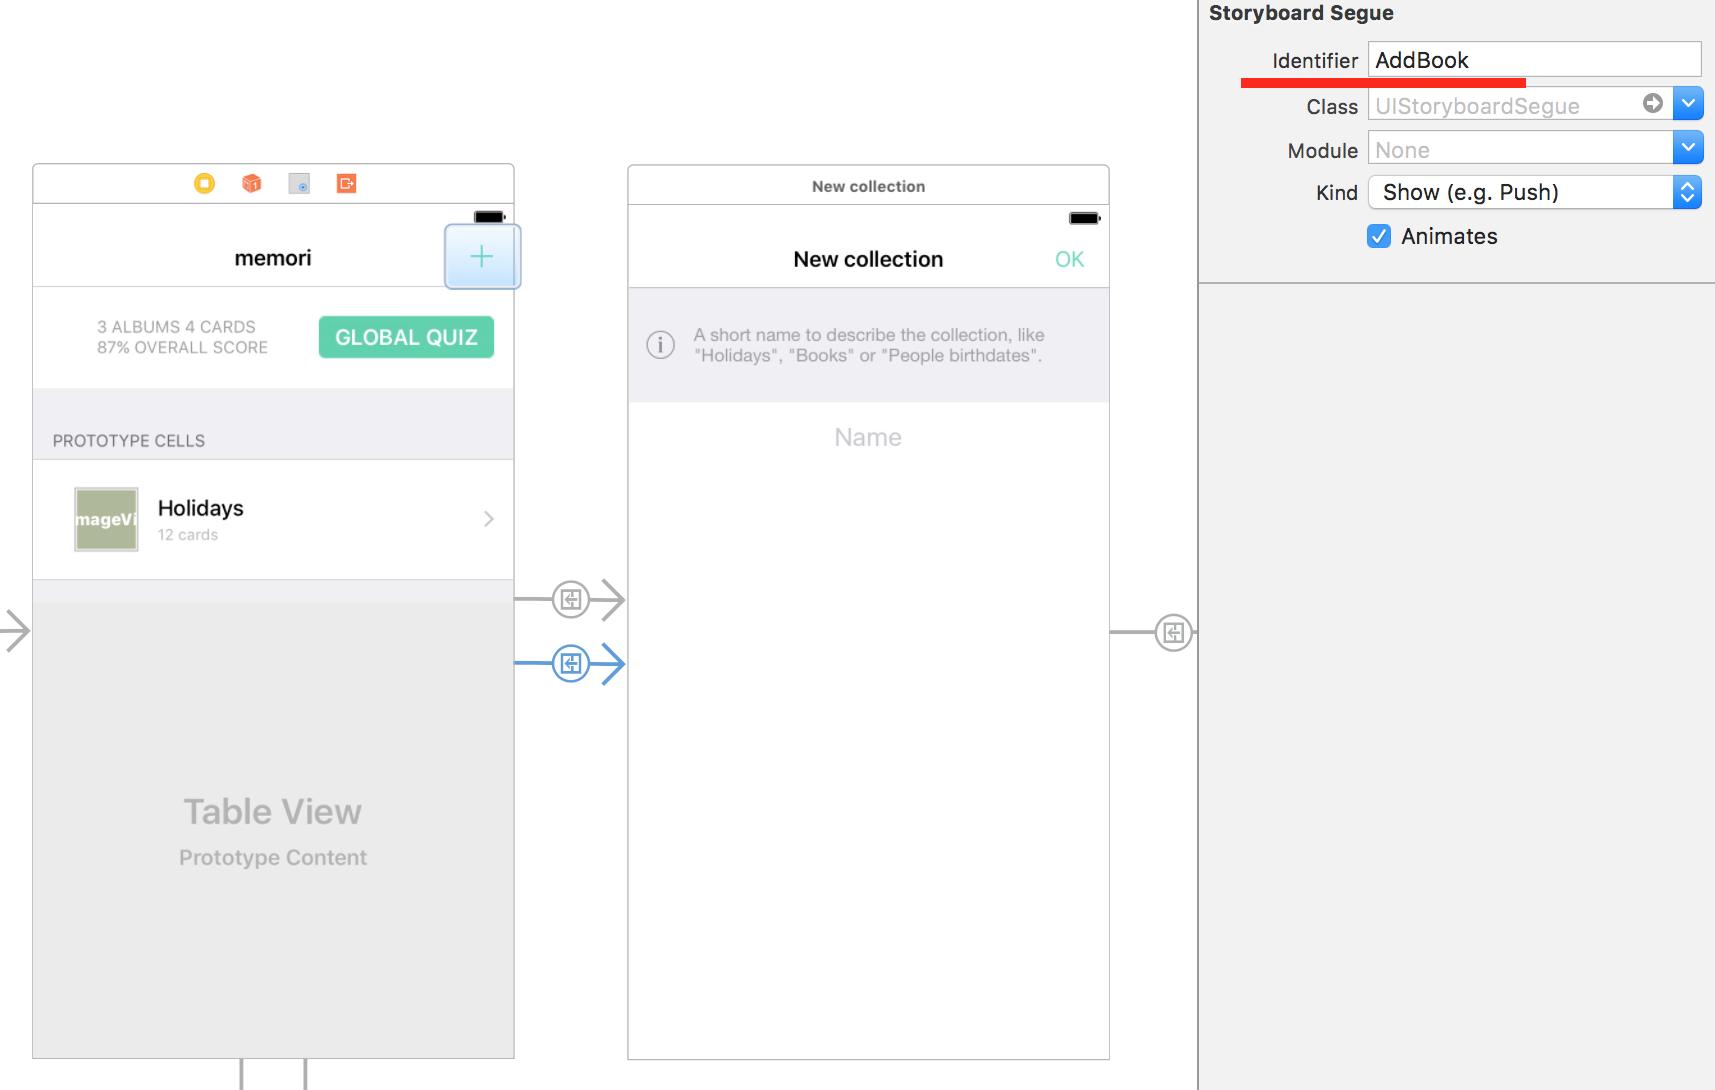
I have to put the following code in the source UIViewController (as per the official recommendation), to pass data to the destination UIViewController:
override func prepare(for segue: UIStoryboardSegue, sender: Any?) {
    if segue.identifier == "AddBook",
        let viewController = segue.destination as? AddBookNameViewController {
        viewController.addBookDelegate = self
    }
}
There's lots of ways this could go wrong at runtime:
- "AddBook" could be misspelled (this lib may help)
- The cast could fail if the destination has changed
- The destination could expect more than just
addBookDelegate
Also, setting addBookDelegate like this means it has to be declared as a var (mutable). It forces AddBookNameViewController to check its value each time it needs to use it.
In a small app like mine it's fine, but I wouldn't use that at all in a big app. This article offers a solution: stop using storyboard segues. I'll definitely consider it for the next app.
Keyboard
To make the card edition more natural, I wanted the card to take all the space at first, and then become scrollable when the keyboard appears. Also, I wanted the card to scroll automatically to show the field tapped by the user, like this:

On Android this is really easy, you can ask the keyboard to "compress" the current activity instead of popping over it. On iOS I had to manually make room for the keyboard, which is not trivial. First I needed to listen for keyboard appearance (and stop listening appropriately):
NotificationCenter.default.addObserver(
    self,
    selector: #selector(keyboardDidShow(notification:)),
    name: .UIKeyboardWillShow,
    object: nil)
Then, when the keyboard opens, get its size and adjust the contentInsets of the main UIScrollView:
func keyboardDidShow(notification: NSNotification) {

   let userInfo: [AnyHashable: Any] = notification.userInfo!
   let keyboardSize = (userInfo[UIKeyboardFrameBeginUserInfoKey] as! NSValue).cgRectValue.size
   let contentInsets = UIEdgeInsetsMake(0, 0, keyboardSize.height, 0)

   UIView.animate(withDuration: 0.3) {
       self.scrollView.contentInset = contentInsets
       self.scrollView.scrollIndicatorInsets = contentInsets
       self.view.layoutIfNeeded()
   }

}
Scrolling the UIScrollView to make sure the currently focused UITextField stays visible after the keyboard is opened is even more verbose, so I removed it from the code above.
Programmatically created views
Creating views programmatically using AutoLayout is needlessly verbose and can be really frustrating. Take this code for example:
- Forget
translatesAutoresizingMaskIntoConstraints = falseand it would crash at runtime with an error message on the first constraint. - Constraints need to be activated, why are they inactive by default? It seems counterintuitive to me.
Tools
XCode
I think XCode is a really, really bad code editing tool. There are lots of reasons, so I decided I would make a dedicated article: I don't like XCode.
iOS simulator
The iOS simulator is amazing. It takes a few seconds to start and then behaves exactly like a real iPhone. You can simulate from iPhone 4 to 7 Plus, from iOS 8.1 to 10 in a few clicks. That means you can create the exact configuration of anyone who bought an iPhone since June 2010, very helpful for reproducing and fixing bugs.
CocoaPods
CocoaPods is an open source project that allows dependency management. Apple doesn't support any kind of dependency management yet (Swift should have it's own tool soon). It's not integrated with XCode but it's quite simple to use with command line.
- A
Podfileat the root of the project contains dependencies and versions. - The
pod installcommand download dependencies and configure the workspace with it. - Then just make sure the project is opened in XCode using the generated
.xcworkspacefile.
Crash reporting
Like on Android, the dedicated crash reporting tool is inefficient since it requires the user to accept sending the report. As usual I went for Crashlytics.
Tracking
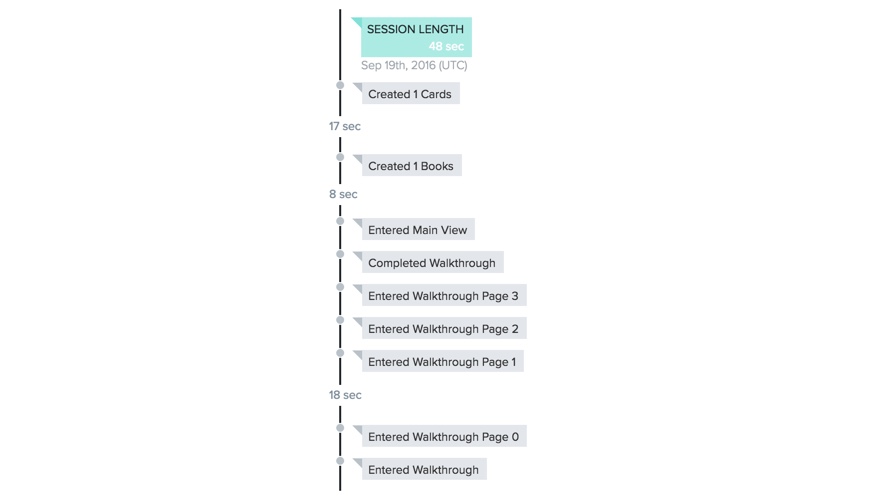
Again, nothing different than what's done on Android. I used Amplitude to get insights on user activity, mostly through funnels, on a small dashboard:

Note that those funnels show some really bad conversion rates! Only one user created more than 2 cards, and I'm pretty sure it's me 👋 ! Also it appears 44% new users skipped the walkthrough. But that's okay, now I can improve the app and compare the conversion rates to see what works and what doesn't.
Publication
The publication on the App Store was a lot longer than a publication on the Play Store, but a lot faster than expected. It took 2 working days to pass the review, which is quite fast compared to the 2 weeks I heard about in the past.
It actually took less than 1 minute for the reviewer to test the app, according to the trackers.
Conclusion
Designing for iOS is definitely easier than designing for Android, the status bar at the top integrates seamlessly with the app and there's no navigation bar at the bottom. There are only a few resolutions to test to make sure the app looks good for everyone. Also, the colors look exactly the same on every iOS device, which is a nightmare on Android. The default UI components look good and the new default system font, San Fransisco, is amazing in many scenarios.
In my opinion, developing for iOS is also easier, or at least the learning curve is shorter and it allows very quick prototyping using the storyboard. It's the first time I stick to my deadlines on a side project. Once again, Android fragmentation doesn't help: each device manufacturer adds its own bugs to the platform. Also the main components (UIViewController) lifecycle is much more predictable on iOS.
Thank you so much for reading this far, feel free to comment, I'd be very happy to hear about your own experience migrating to/from iOS!