Three months ago I created my first iOS app, Memori. At the time I naturally adopted the platform recommended architecture: Model View Controller (MVC). But as I kept adding features to the app, my UIViewControllers became more and more complex, making it harder to evolve and to test.
MVC problems
There are already a lot of articles on the subject so I'll be brief. This is the MVC pattern big picture from the documentation:

In theory, this separation of concerns puts all the "interesting" logic into the controller, which is a UIViewController, leaving the view and model as mere data structures triggering events. But in practice, the controller is so tightly coupled to the views and their implementations that we end up with huge controllers taking care of a lot of view-related stuff. It also has to deal with its lifecycle and sometimes the lifecycle of other controllers. Because of all that, some renamed the MVC pattern as the "Massive View Controller".

MVVM, an alternative to MVC
There are multiple alternatives to MVC, among which is Model View View-Model. With MVVM, UIViewController is now part of the view. In fact, anything that depends on UIKit is part of the view. Then, it introduces a notion of "view-model" to fill the gap between the view and the model.

MVVM works at its best when used with a binding framework, dealing with all the "Notify" part for you. The 3 main choices for this are SwiftBond, RxSwift and ReactiveCocoa. They're all very similar and each one would do a great job here. I decided to give ReactiveCocoa a try — version 5.0.0-alpha.3 as I write these lines.
Enough theory! In this article we'll see how to deal with MVVM in the following scenarios:
- Simple example
- Collections
- Navigation
- Tests
Simple example
Let's take the first screen of Memori as an example. There's a UILabel at the top showing the user's current overall progress. If we delete an item in the collection, we expect that value to be updated.

Model
struct Book {
   let name: String
   let cardCount: Int
   let progress: Float
   ...
}

class BookStore {
   let books = MutableProperty([Book]())
   ...
}
MutableProperty is part of ReactiveSwift, upon which is based ReactiveCocoa. You can see it as a normal field except it can be observed and bound to other properties.
ViewModel
class ViewModel {

   let currentProgress = MutableProperty("")

   init(withBookStore bookStore: BookStore) {
      // Each time 'books' is updated on the store,  'currentProgress' is updated with the computed value
      currentProgress <~ bookStore.books.map { books in
         let progress = computeCurrentProgress(fromBooks: books)
         return "\(progress*100)% KNOWN"
      }
   }

   ...
}
<~ is a ReactiveSwift overloaded operator to bind a "signal" to a "target". A MutableProperty is both a signal and a target so we can bind BookStore.books to ViewModel.currentProgress. The map(transform) operator allows us to transform the list of books into a string along the way.
View
class ViewController: UIViewController {

   // Injected
   var viewModel: ViewModel!

   // Injected
   @IBOutlet var progressLabel: UILabel!

   override func viewDidLoad() {
      super.viewDidLoad()

      // Uses ReactiveCocoa extensions to bind the text
      // of the UILabel to the Property in the ViewModel
      progressLabel.reactive.text <~ viewModel.currentProgress
   }

   ...
}
ReactiveCocoa adds a reactive fields to most UIView, allowing us to bind a property directly to the text of a UILabel for example.
That's it, any change to the books property in the model now automatically updates the label in the view. 👍
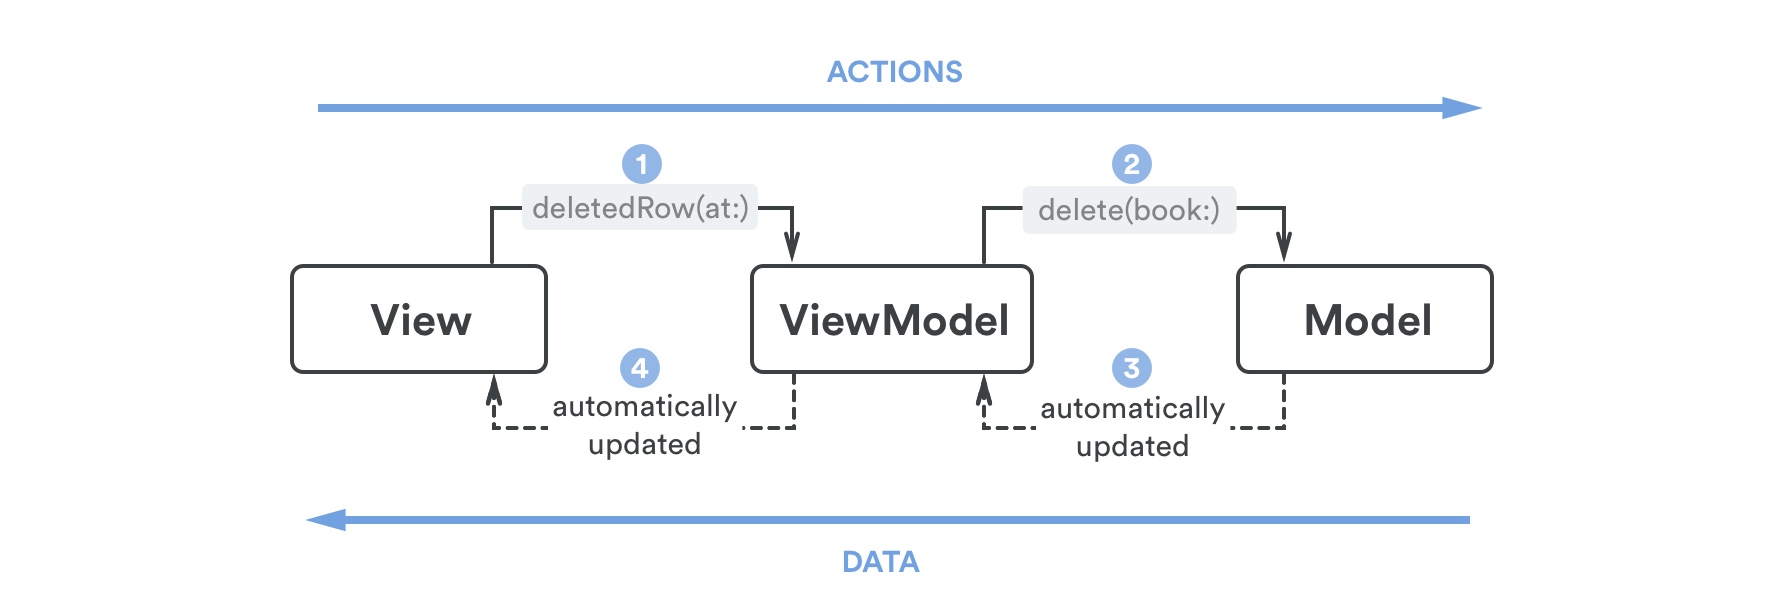
So for example if the user deletes a row in the UITableView, the view calls the view-model, which calls the Store, which updates its books property.
There are a few rules while developing with MVVM:
- The view-model never ever uses UIKit. This rule is very important to isolate it from the view, whose
UIKitis an "implementation detail". If that rule is respected, you could even have an iOS (UIKit) and a macOS (AppKit) app sharing the same view-model code. - The view doesn't know anything about the model. It may be tempting for the view-model to expose a
Bookfor the view to display, but it's not the view's concern to find the expected fields or to format a date for example. Instead the view-model should extract and transform the date as aStringfor the view. - The model is in complete isolation from the rest of the app.

These rules should be enforced using different modules and dependencies, especially in a large team. I know it's possible using multiple projects and dynamic frameworks (video), but my app is small, I'm the only one working on it and I like to have the ***ViewController.swift and ***ViewModel.swift files side-by-side, I think it's not worth the effort. (Booo! 👎)
Collections
Using UITableView or UICollectionView raises new questions. Who's responsible for being the UITableViewDataSource? How to bind the view-model to the cells which are lazily created and reused?
The data source, given what we said earlier, is on the view side since it's extending a UIKit class. It would need to ask the view-model for the cell count and the data to display on each cell. The best way to deal with this situation is to give each cell a specific view-model to bind to, which leads me to 2 new important rules:
- Only a view can create another view.
- Only a view-model can create another view-model (except for the very first one of your app, which should be created by the
AppDelegate).
With that in mind, here's what we'll achieve:
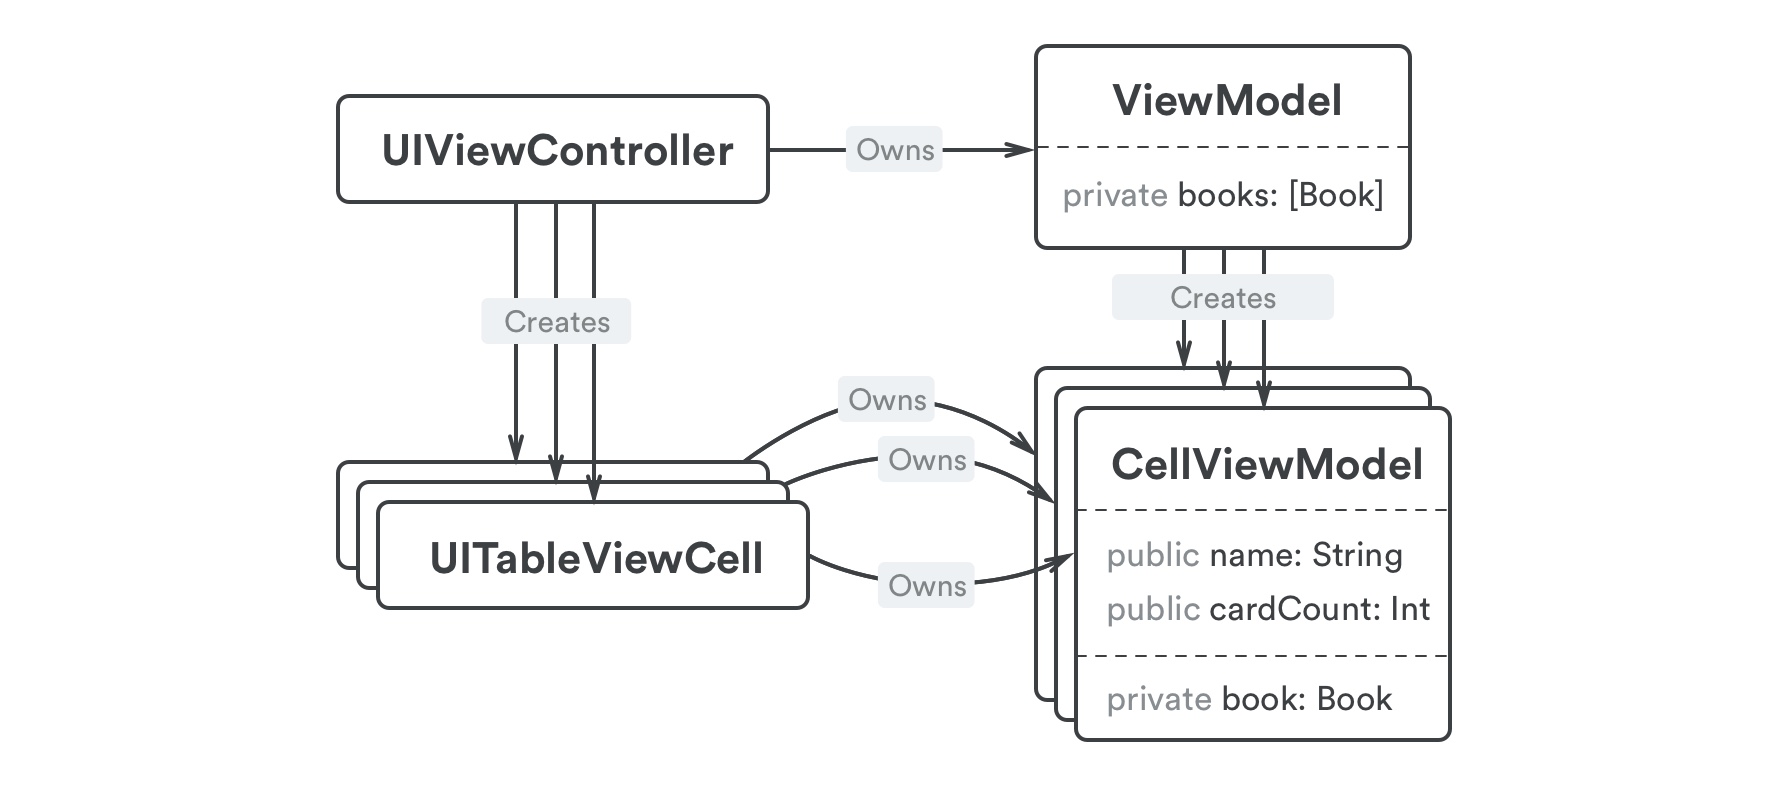
The separation of concerns is good: the view-model part doesn't know anything about the view, it just knows how to create the view-model of a cell. You could easily switch from UITableView to UICollectionView on the view side without changing anything in the view-model.
The relevant part of the code to set it up is straightforward:
ViewModel
class ViewModel {
   private var books: [Book]
   func getBookCount() -> Int {
      return books.count
   }
   func createCellViewModel(forIndex index: Int) -> CellViewModel {
      return CellViewModel(withBook: books[index]!)
   }
}

struct CellViewModel {
   let name: String
   let cardCount: String
   init(withBook book: Book) {
      self.name = book.name
      self.cardCount = String(book.cardCount)
   }
}
I didn't use reactive properties for CellViewModel.name and CellViewModel.cardCount. It would add unnecessary complexity in this case: if a cell needs updating, we'll bind it to a new CellViewModel instead (see below). Due to the frequency at which these objects will be created, I used a struct instead of a class.
View
class ViewController: UIViewController, UITableViewDataSource {

   ...

   func tableView(...numberOfRowsInSection section: Int) -> Int {
      return viewModel.getBookCount()
   }

   func tableView(...cellForRowAt indexPath: IndexPath) -> UITableViewCell {
      // The View creates the View
      let cell = tableView.dequeueReusableCell(withIdentifier: "BookCell")
         as! TableViewCell
      // The ViewModel creates the ViewModel
      cell.viewModel = viewModel.getBookViewModel(atIndex: indexPath.row)
      return cell
    }
}

class TableViewCell: UITableViewCell {

   @IBOutlet var nameLabel: UILabel!
   @IBOutlet var cardCountLabel: UILabel!

   var viewModel: CellViewModel! {
      didSet {
         nameLabel.text = viewModel.name
         nameLabel.cardCount = viewModel.cardCount
      }
   }
}
Almost done! There's one question left, how does the view know when to reload the list? The most basic way would be to create a Signal on the view-model that would emit any random value when books are updated. Then the view would observe this signal and call tableView.reloadData() on each new event.
However, with reloadData(), UITableView doesn't have enough information to animate the changes automatically. With traditional MVC, the UIViewController would delete the book and then call tableView.deleteRows(at:with:) to animate the change. But then you can't really test it, and an inconsistency between the source data (books) and the calls to UITableView.deleteRows / insertRows / reloadRows can lead to intricate bugs.
Using MVVM the view doesn't have access to the model though, so it doesn't know what was added, removed, or updated. To tackle this problem, we can use a library called Changeset (by Joachim Bondo) which can compute the minimal edits to go from one collection to another. It also adds an extension to UITableView and UICollectionView to directly apply those edits and make the appropriate calls to UITableView.deleteRows / insertRows / reloadRows.
The idea is that whenever the view-model changes its books property, it computes the change set from the old value to the new, and sends it to the view. The view can then apply it to the UITableView to create the necessary animations.

// ViewModel
class ViewModel {

   let booksChangeset = MutableProperty([Edit]())

   private var books: [Book] {
      didSet {
         booksChangeset.value = Changeset.edits(
            from: oldValue,
            to: books)
      }
   }

   func deleteBook(at index: Int) {
      books.remove(at: index)
   }
}

// View
class ViewController: UIViewController {
   override func viewDidLoad() {
      ...
      viewModel.booksChangeset.producer
         .startWithValues { edits in
            self.tableView.update(with: edits)
         }
      }
   }
}
The Edit class comes from the Changeset lib, along with the UITableView.update(with:) extension. Note that it won't compile unless Book implements Equatable.
As you can see, it's quite simple to setup, and it's a very powerful pattern: the view-model minds its own business and still doesn't know anything about the view, but if it changes its books property, then the UITableView is automatically updated, with proper animations! You can easily unit tests the changeset if needed, but since it's bound to the data itself, it's quite bug proof already.
Note: It comes with a price though, computing a changeset can take time, I wouldn't recommend using that on a very large list of items with expensive Equatable implementations. As a workaround, it's quite easy to generate the changeset manually when you add or remove items. It's already what you do with a traditional MVC, but the Changeset lib offers you a pivot format (Edit) between the view-model and the view, which lets you easily unit test that the changesets are valid.
Navigation
We already know everything we need to know to make proper navigation within the app: the view creates the view and the view-model creates the view-model. If we use storyboard segues, we would do this:
override func prepare(for segue: UIStoryboardSegue, sender: Any?) {
   if segue.identifier == "AddBook",
      let viewController = segue.destination as? AddBookNameViewController {
      viewController.viewModel = viewModel.getAddBookViewModel()
   }
}
But there's one interesting thing here about the decoupling between view/view-model. Let's take the book creation UI as an example:
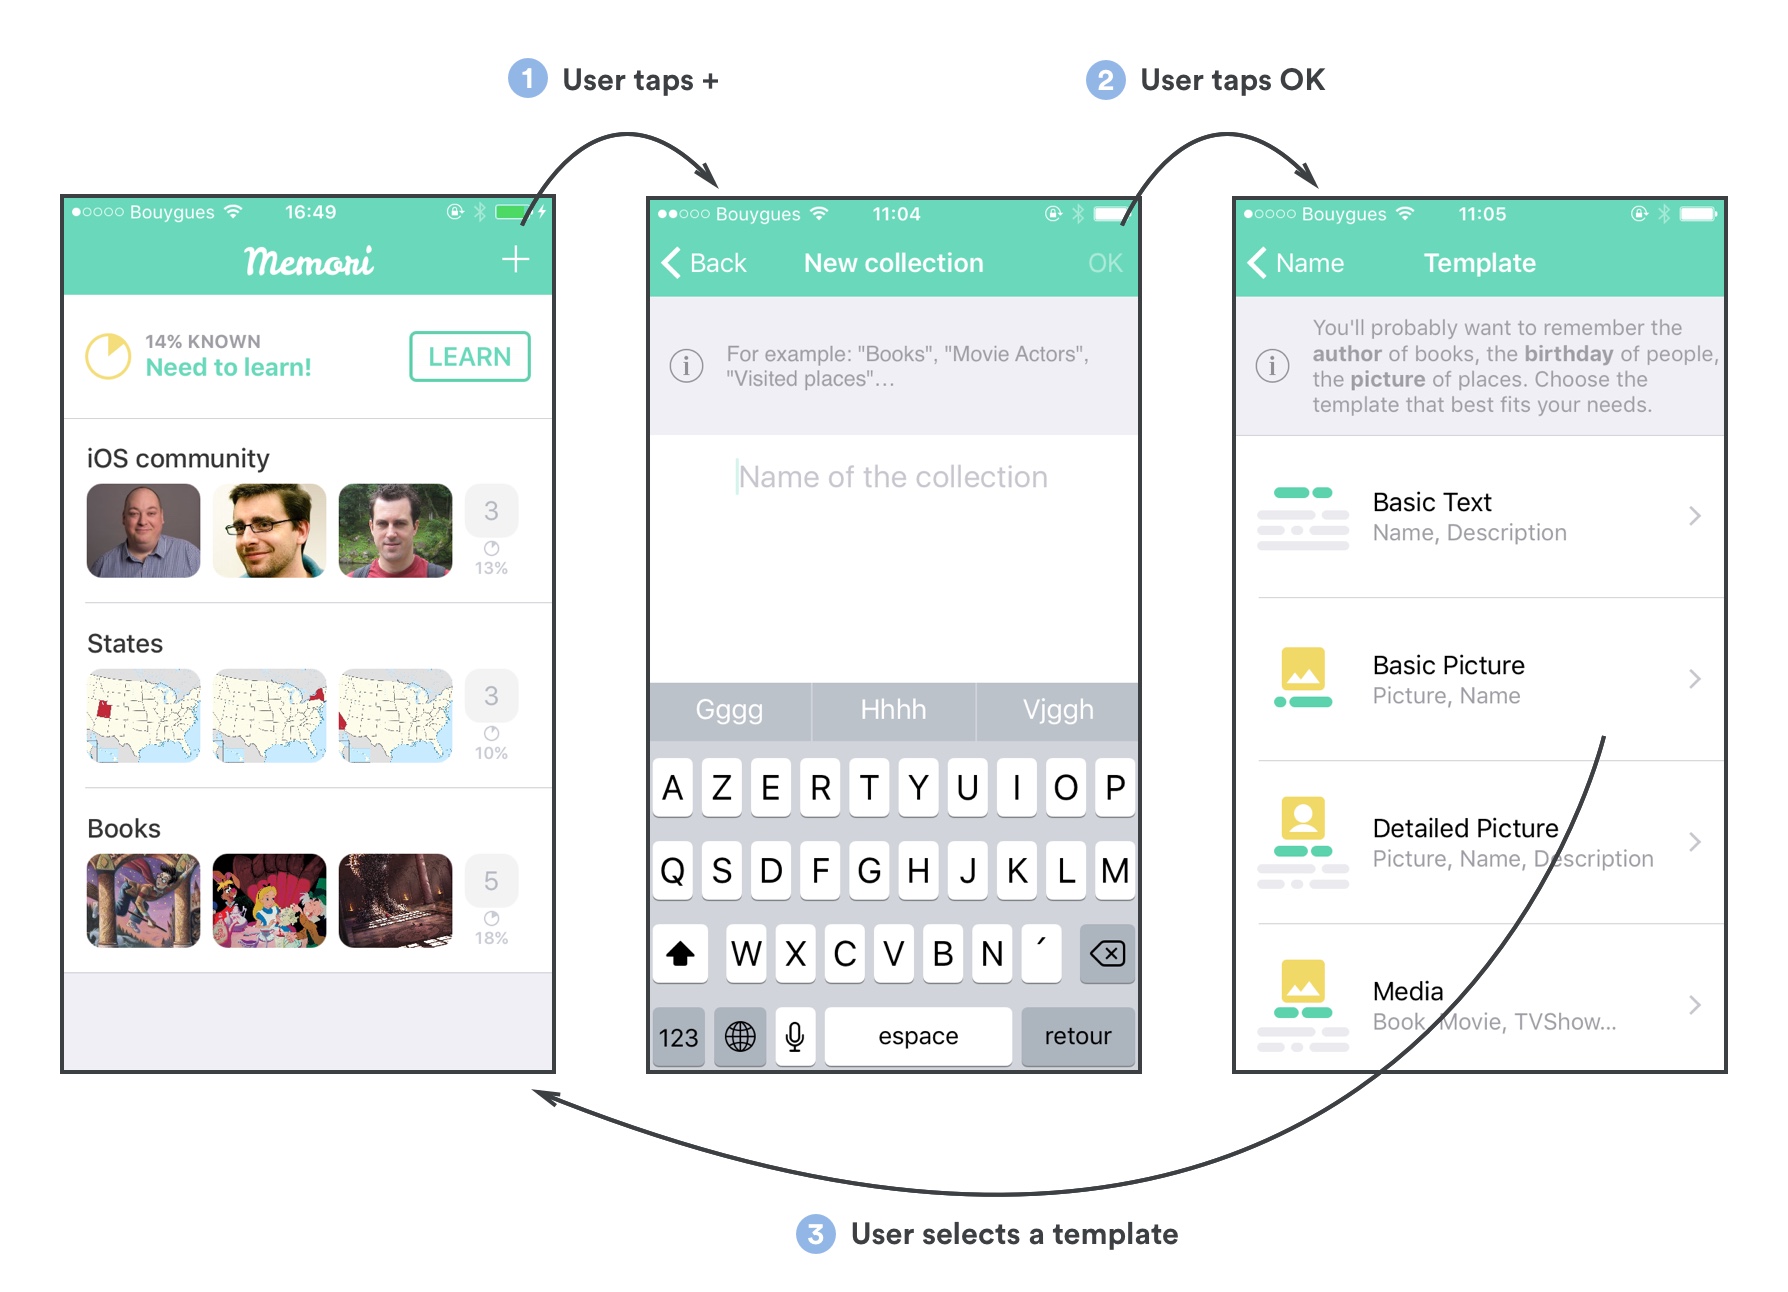
We need 2 UIViewController for the "Add book" part because there are two different screens inside of a UINavigationController. But adding a book is really one process, so we can have a single AddBookViewModel for both views. The first view sets the name on it has the user is typing, and then passes it to the second view when he presses "OK".
About back navigation, it's totally OK to pass a Delegate from one view-model to another, as you would have done between UIViewControllers before:
protocol AddBookViewModelDelegate {
   func bookCreated(_ book: Book)
}
Tests
That's the interesting part. As the view-model is completely decoupled from the view, we'll be able to test most of its logic with pure unit tests, independently from the app itself. It's called "non-hosted" or "logic" testing, it runs faster but it's also easier to read and write than UI tests since you don't need to simulate the lifecycle of views and view controllers.
To make that work, first you need to remove the Host Application from the test target.

Then, since the tests are no longer "hosted" by the app, you need to add each model and view-model source file to the test target.
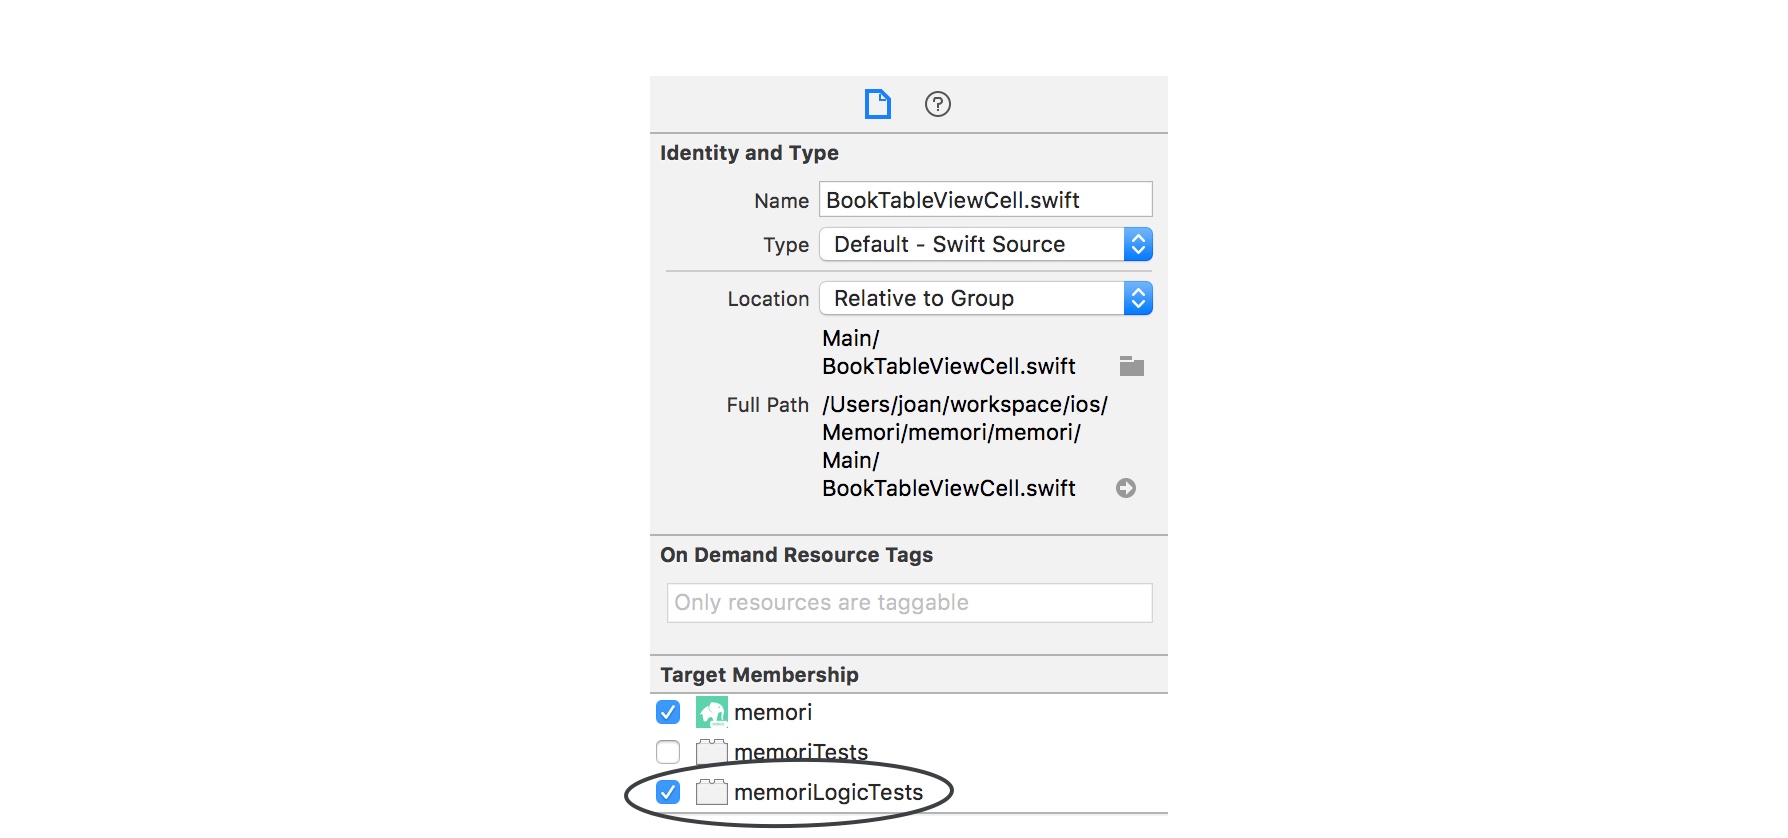
Note: That also means you need to remember to check that box, every time you create a new file. If anyone has a quick solution for that I'll take it. Otherwise I guess using different projects for the model and the view-model would be the best solution.
You can now write very efficient unit tests:
func deleteBook_progressLabelShouldUpdate() {

   // Arrange: create view model with 2 books
   let testStore = BookStore(initialBooks: [
      createTestBook(name: "Test1", cards: 10, known: 0.5),
      createTestBook(name: "Test2", cards: 5, known: 0.2)
   ])
   let viewModel = MainViewModel(withBookStore: testStore)

   // Act: delete a book
   viewModel.deleteBook(atIndex: 1)

   // Assert: check new progress value
   XCTAssertEqual(viewModel.currentProgress.value, "50% KNOWN")

}
Conclusion
As we've seen, Apple MVC has some drawbacks when it comes to testing and separation of concerns, UIViewController tends to become a huge class with many responsibilities. MVVM is an alternative in which the UIViewController is part of the view, and an extra layer called "view-model" is inserted in-between the view and the model.
I like MVVM because it doesn't overwhelm the project with extra classes and levels of abstraction. It feels like it only extracts the meaningful code previously buried in the UIViewController into another class that is easier to read, test and reason about. Also, it's simple enough to be understood quickly by someone else, but powerful enough to progressively change the way the app is developed: be able to start a new screen by writing its logic and test it before doing any UI related stuff is very satisfying and comforting. It also eases the use of TDD, since tests can run very quickly, especially from the command line using xcbuild + ninja and xctool.
On the downside, transition from MVC to MVVM in an existing app is not easy. One UIViewController can hardly adopt MVVM partially, so most of the time I wrote the full view-model of a screen, then I migrated the whole UIViewController at once. This can be a blocking point for a large app.
Thank you for reading, I hope it gave you some insight into the MVVM architecture and inspired you for your next app. Feel free to share your own experiences, comment if anything seems wrong and I'll be happy to answer any question! 👋